Making the Designer generated widget work | |
| Prev | Next |
As you may have noticed, the widget is shown but it doesn't do much, so we'll make it work a bit.
First, open the centralviewbase.ui file with designer using the File Groups tab (at the left), inside the User Interface branch.
Within Designer, select each of the widgets that will be used from the application and give it a name. I've called m_label the pixmap label, m_red the slider for the red component, and m_green and m_blue the other two sliders. In case you're not familiar with the m_ naming scheme, I can only say that a naming scheme like it is the best invention since sliced bread. It makes the code much more readable and it's much easier to get new developers to understand your code.
As a quick guide to the naming scheme I use, I can cite some rules:
Always name compound names like “maximumSize” and not “MaximumSize” or “maximum_size” . The only exception is for class names, which must be capitalized (“MaximumSize”).
Always prepend m_ to your member variable names. This way you'll know when a variable is local to a method, or it's from the class you're in.
Never use getXXX() as a name for an accesing method of a class (the usual methods which just do { return m_XXX; }; ) . It's much better to always use just the property name, so use something like QFont font() const { return m_font; }; . In this way, the corresponding set method should be the property prepended by “set”, so the pair to get/set a property is font() and setFont(const QFont &) in our example.
Always give bool variables positive names and not things like bool m_noBackground. It will be much better to understand the usage of the variable if it's called m_background and then use if (m_background) ... than if (!m_noBackground) ... .
Ok, now our widget have names that we can use through the CentralView implementation (because CentralView inherits from CentralViewBase), but it's not enough. We'll also add slots to CentralViewBase, and as they're virtual methods, we'll overload them at CentralView. Let's do it so that you understand it better.
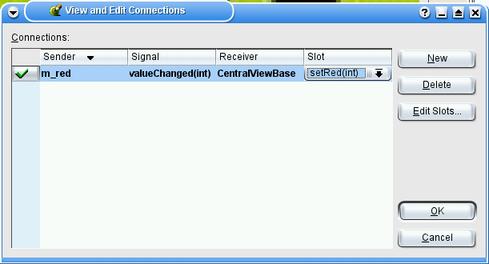
First, open the Slots dialog from the Edit menu or by right clicking in the main widget. Click on New Function and give it the name setRed(int v), create two other slots called setGreen(int v) and setBlue(int v). We'll have these slots called whenever the user modifies the red/green/blue slider. To do so, exit from that dialog and select Connect Signals/Slots from the Tools menu, the arrow icon in the toolbar, or by pressing F3. Then click with the left mouse button on the red slider and without releasing it, move it to the main widget (to one of the borders for example). There's a magenta rectangle that shows the widgets that will be connected. Once that the origin is the red slider and the target is the main widget, release the button and you'll be shown a dialog to configure which signal from the origin widget connect to which slot from the target widget.
In the dialog, click on the No Signal field and select the valueChanged(int) signal. Then, select the setRed(int) slot. Connect also the corresponding signal of m_green and m_blue to setGreen(int) and setBlue(int).
Now, we note that color components usually go from 0 to 255 (and that's what the documentation for QColor says), so we'd like the slider to provide us with numbers from 0 to 255, in order to do that, we select on each slider and change the maxValue property (in the property editor) to 255.
Save the user interface, and close designer to go back to KDevelop.
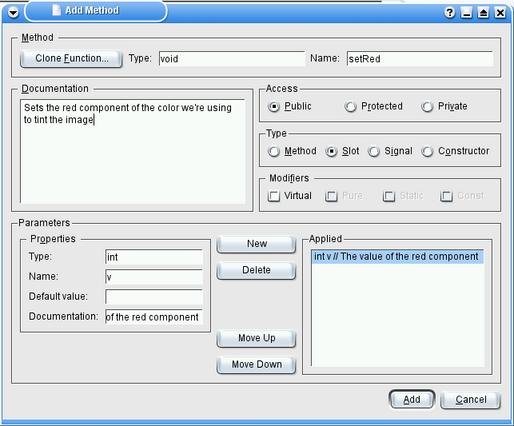
Back in KDevelop, open the Classes tab, right click on the CentralView class and select New Method in the popup menu. We'll reimplement here setRed, so that it's used instead of the one in CentralViewBase. So the name is setRed, the type is void (that's the type of the return value), and we put a parameter of type int to make it as the slot that we created in Designer. We do that two other times to create also the setGreen and setBlue slots.
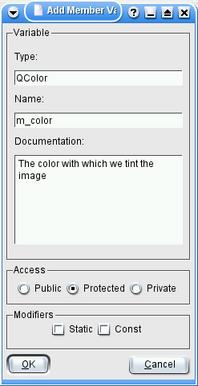
Now we're adding a new variable, which is going to be the color used in TheTinter and which will be of type QColor, to do so, right click again in the class name of the tree view and select Add atribute . Use QColor as type and m_color as name. Just to be correct, we'll make it protected too.
Now, we're going to implement the slots we just added to modify the m_color value. We use the following code:
void CentralView::setRed(int v)
{
     m_color.setRgb( v, m_color.green(), m_color.blue() );
     updatePixmap();
}
which uses the new value for the red component and leaves the other values
fixed. We also call a method updatePixmap() that will update the pixmap with
the m_color color. Now, let's add that method, and implement it.
void CentralView::updatePixmap()
{
    QPixmap pixmap(128,128);
    pixmap.fill(m_color);
    m_label->setPixmap(pixmap);
}
The first line creates a 128x128 pixmap, and with the second line we fill it with the color. The third line finally puts that pixmap in the label. The 128x128 size is a bit arbitrary, as the label will resize it to fill the whole area (you can change it in one of the properties of the label if you want).
This is our source code for s3, we'll soon make it load an image and then tint it with the color instead of just painting a flat filled rectangle, but first, we'll try to make it not flicker (note that if you move one of the sliders fast, the label will flicker a lot). That will be our next target.
| Prev | Home | Next |
| Using the designer | Up | Removing flicker using a timer |